home

Showing posts with label paper. Show all posts

wrap it up! [2012]

With only one day left to Christmas shop, I figured a little wrapping inspiration might help get you through the heaps of goodies to wrap up and get under the tree. Wrapping presents up is always one of my favorite parts of the season.


[amazing porcelain initial tags that will become ornaments from Anthrologie's collection this year]


[ornaments made for miniature trees make a great addition to little presents] 


[vintage ornament attachments for those you know are bound to appreciate them]


[I love these kraft paper boxes with wood print and polka dots that I scored from Target's dollar section this year!]


[tie it all together with holiday yarn, candy canes, a kraft paper tag and a jingle bell]

all it takes is:
scissors and tape...of course
some solid wrapping paper, some craft paper, & some classic (usually for the kiddos)
boxes if better suited
bakers' twine and/or holiday inspired yarn
a variety of tags & a pen
candy canes, vintage ornaments, bells, etc. etc. to personalize things a bit

a peak into my gift wrap from last year

DIY: baby shower invitation: [cute as a button]


My best friend is having a baby girl and I couldn't be more excited for her. This weekend we are going to shower her in love, love, love. Making the invitations for her shower was pure joy. She wanted a shower that was a rustic and beautiful spring tea party. Not the kind of tea party you had as a kid or the kind that you would have at high tea with the queen. This party will be an iced tea, spring warmth, mini foods, delight! 

Here is the step-by-step for the invite:


You'll need...


I designed the layout on my computer using two contrasting typefaces, a centered alignment, coral and mint coloring, on a 5x7 ivory card stock. 


Once I had the invitations all printed out, I punched two holes in the top center about an inch apart. I made sure to punch them high enough up so that when the fabric ribbon was added, it wouldn't cover the type. 


I bought grey linen fabric from Mood and cut it about 4 inches long then frayed the edges. 


pull one side through the punched hole...


then the other...and flip the invite over.


take both ends in one hand and punch them together making sure the fraying is laid out how you want it.


lay it back down and stretch the ends equally and taught, flattening them out...


pinch one side towards you and feed it back through to the front. repeat on the other side as well...


*the action of pinching your ribbon or fabric towards you is a crucial step. if you do this step correctly, then the ribbon will lay flat on the front of the invite


flip the invite over. pull the ends outward and "fluff" the edges so that they look how you want them to. 


using a small dot of glue (which dries clear) apply the button. hold down the edges of the button for 10-15 seconds so that it adheres to the ribbon. 


give it time to set and dry and you're all set


repeat.repeat.repeat


hand address your envelopes for an intimate and personal touch & and you are ready to put them in the mail and send them off. the best part is that you have a customized invite, embellished with an adorable button and the postage is no higher than normal. 


 the invites are out, the RSVPs are coming in (yes, even still), and we are ready to celebrate the joy of baby Emi growing in Christine's belly!

YAY! next week I'll be back with a little recap of the shower for ya!


engagement guide

As promised last week, here is a gift guide for an engagement of a close friend. 


[one]: CHAMPAGNE; There's nothing better to celebrate with than the couples favorite bottle of bubbly!
The couple I'm celebrating loves the Schramsberg Blanc de Blancs

[two]: NOTEBOOK; Every planning bride-to-be needs a mini, light-weight notebook that they can throw in their purse, car, gym bag, ect so that when a "light bulb", "got-to-have-that", moment hits, they can write it down quickly.
There isn't a notebook on the market that I love better than the Field Notes brand.  

[three]: CHOCOLATE; a good bar of chocolate is like a bar of gold.
This one is dark chocolate, sea salt, and toffee. It's to-die-for!

[four]: HAND CREAM; A hand that's got a brand new sparkly ring needs the hand cream to go along with it.
This one is rich in shea butter which is my favorite because it doesn't feel greasy or sticky and stays on long. The bonus to this one is that the packaging is delightful. 

[five]: BOX; The moment that you realize you're ring is not on you're finger, you panic.  If you have ONE place to put it when you take a shower, wash the dishes, go to bed, you'll feel better knowing it's always there. This is advice I've given to all my friend who get engaged and ask me what I do with my ring when it's not on my finger. 
I love that this dish has a lid so that dust and other bits don't end up alongside your ring. 

[six]: POLISH; The first months, ok years, that I've had my ring I've wanted my nails perfectly manicured. A neutral color that you can paint yourself, or take with you to the salon so that when it needs touching up you've got it, is key. 
Dear Diary polish by OPI for Sephora is a great shade and lasts long. 

[seven]: PJ SHORTS (or lingerie); Every girl needs cozy things that make her feel good. 
Anthropologie always has great pieces


Every great present needs a great card too. I made this one for my friends... 


If you want to make one like this, you can follow this DIY

Happy Friday peeps! Go love on your friends this weekend!


xo


wrap it up!

As promised many times last week....gift wrap ideas are finally here today! I think that the way a gift is all wrapped up is just as important (well almost) as what is inside. I think it should be thoughtful and inspiring.

This year I started with bits like these that are both vintage and vintage inspired:


I used kraft paper, white boxes, or jars to wrap up most of my gifts. I love kraft paper because it is has such a raw and natural feel to it, you can find it recycled, it's cheap and it provides a great contrast to add sparkly ribbons and additions to. If you don't have kraft paper laying around you can always cut up a paper grocery sack and flip it inside out.

And, I ended up with these:

[a topiary for my friend Ivy]

[cut into a shoe box, wrapped it in kraft paper, tied layers of ribbon over a doily] 
[details]


[layered yarn with a white glittered snowflake, topped with a teeny snowman] 
[these little boxes of cookies and fleur de sel caramels went to each of the families I work with]
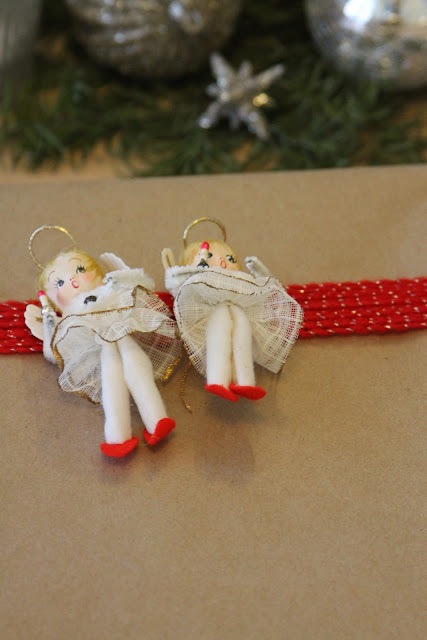
[kraft paper wrapped with red layered yarn with glittered thread and topped with vintage angels]


[are they just the cutest things?!?! A gift themselves!]

[a glittered bag with a kraft paper tag]

[jarred chocolate covered bing cherries]


How about you? What do your gifts look like this year? Have you wrapped them up yet or do you still have lots to go? Do you usually have a theme to your wrapping or do you just wrap away?

it's a wrap!

I know it's still November but since the holidays are around the corner, and there will be lots of wrapping to do, I thought I would share a gift wrapping idea with you. I did this for one of my girlfriends birthdays a few months back and it would be great for the holidays too. It is cheap, colorful, easy and festive. You can choose any color yarn you want and for the holidays you could even incorporate doilies with it, jingle bells, or a small ornament. A photo ornament as the gift tag would be great tie in.

what I used:
kraft paper
three different colors of yarn 
a pom maker 
manila tags

what I did:
wrapped the present as per usual
started with the first type of yarn (grey flecked) and wrapped it around the gift in a wide and open pattern
then wrapped the second yarn (bright multicolored) more densely and narrowly towards the middle
tied on the pom I made from the third yarn (bright solid pink)
then I wrote a note one manila tag and slid it into the area created between the yarn and the box
for the smaller box I cut the top off another manila tag and wrote a short personal note

[kraft paper and yarn]

[the yarn will create a perfect pocket to slip a card or note in]

[make it personal]

How fun, right?!?! If you have any questions about what I used or how, let me know! Any other touches that you can think to add are always good. Just make it simple and personal.

Also, don't forget about the GIVEAWAY...not much time left!


paper

"Only on paper has humanity yet achieved glory, beauty, truth, knowledge, virtue and abiding love."
-George Bernard Shaw

Lovelies, this should have been one hint that I love making cards from scrap paper and little tidbits that I find. If there is something special that gives me a chance to make a homemade card, I'll take it. There are reasons that would be obvious to make something special for someone, but an any day "I love you," "I'm thinking about you," "I appreciate you," goes a far way to give someone something to smile about. Below are two cards that I made for birthdays. Be inspired to make something pretty for someone you love.

Follow these steps...

[start with the basic papers]

[add some great flare]

[make it personal with your message]

[tie the theme together on the envelope]

 Repeat as necessary...


[a happy working space is always a good thing.]

[the best part should always be your authentic and sincere message to the recipient]